
Detached Chain filling - How to
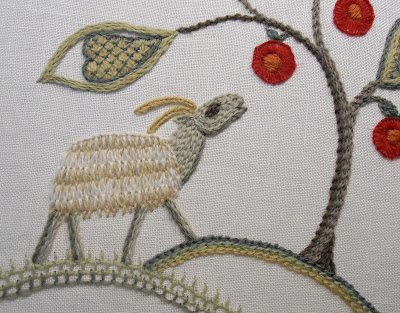
Do you remember this one....?
I am putting the final touches to 'Apple Thief' and if all goes to plan the kits will be in the SHOP in the next two weeks - Yes, in time for Christmas!
I still haven't made this little piece into anything, but with the festive season fast approaching I am thinking that perhaps, just perhaps, I made make it into something just a little bit Christmassy - I don't know???
While working on the notes it occurred to me that I haven't seen Detached chain stitch used as a filling the way I used it for the goat's fleece anywhere else. I did share a few Work In Progress photos when I was working on the project, but they are not all that clear so I have put together some better step-by-step pics if you would like to try it:
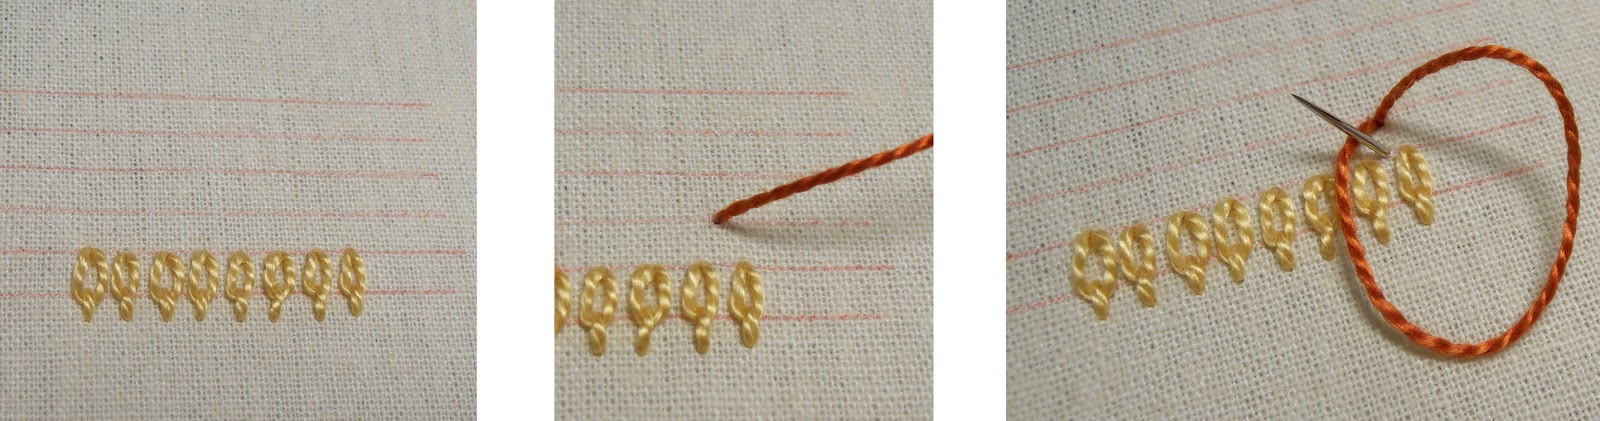
The spacing will depend a bit on the type of thread you use. I have spaced them approximately 3mm ( 1/8") apart for crewel yarn on the goat and for the perle 5 cotton use here.

1. Stitch detached chains (lazy daisy) side by side between the lower two lines.
NOTE - the stitches are spaced slightly more than the thread width.
For each stitch, bring the thread to the front on the upper line and take the needle to the back through the same hole.
2. Emerge on the lower line, inside the thread loop.
3. Secure the chain with a short anchoring stitch.
NOTE - I have make these a little longer, but if you wanted a smooth lower edge, go to the back just over the loop.

4. Continue to the other side, keeping the stitches (relatively) evenly spaced.
5. Bring the next colour to the front on the line above and midway between two stitches on the first row.
6. Bring the needle to the front on the line below, midway between the previous stitches.
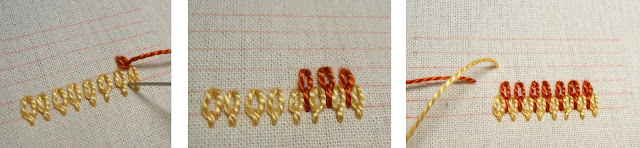
7. Secure the chain with a long anchoring stitch, taking the needle to the back on the bottom line.
8. Continue to place a stitch between each of the previous in this way.
9. When you get to the other side, rest the thread. Bring the first colour to the front on the next line above.
NOTE - to 'rest' your thread, simply bring it to the right side a short distance from where you are working and unthread the needle. That way you can easily pick the re-thread it later and continue stitching.


By signing up, you will also be sure not to miss out when the Handmade with Love Super Bundle with 200+ needlecraft patterns and tutorials goes on sale on 27 November. I am super excited to be part of it and I am sure you will find more than one pattern you will want to stitch/quilt/applique/crochet... More details with a complete list of patterns will be released on 27 November so it is definitely worth having a look at..

I am putting the final touches to 'Apple Thief' and if all goes to plan the kits will be in the SHOP in the next two weeks - Yes, in time for Christmas!
I still haven't made this little piece into anything, but with the festive season fast approaching I am thinking that perhaps, just perhaps, I made make it into something just a little bit Christmassy - I don't know???
While working on the notes it occurred to me that I haven't seen Detached chain stitch used as a filling the way I used it for the goat's fleece anywhere else. I did share a few Work In Progress photos when I was working on the project, but they are not all that clear so I have put together some better step-by-step pics if you would like to try it:
Detached Chain Filling
Before you start, you will need to rule parallel lines across the shape you want to fill - this makes it easier to get the stitches even.The spacing will depend a bit on the type of thread you use. I have spaced them approximately 3mm ( 1/8") apart for crewel yarn on the goat and for the perle 5 cotton use here.

1. Stitch detached chains (lazy daisy) side by side between the lower two lines.
NOTE - the stitches are spaced slightly more than the thread width.
For each stitch, bring the thread to the front on the upper line and take the needle to the back through the same hole.
2. Emerge on the lower line, inside the thread loop.
3. Secure the chain with a short anchoring stitch.
NOTE - I have make these a little longer, but if you wanted a smooth lower edge, go to the back just over the loop.
4. Continue to the other side, keeping the stitches (relatively) evenly spaced.
5. Bring the next colour to the front on the line above and midway between two stitches on the first row.
6. Bring the needle to the front on the line below, midway between the previous stitches.

7. Secure the chain with a long anchoring stitch, taking the needle to the back on the bottom line.
8. Continue to place a stitch between each of the previous in this way.
9. When you get to the other side, rest the thread. Bring the first colour to the front on the next line above.
NOTE - to 'rest' your thread, simply bring it to the right side a short distance from where you are working and unthread the needle. That way you can easily pick the re-thread it later and continue stitching.
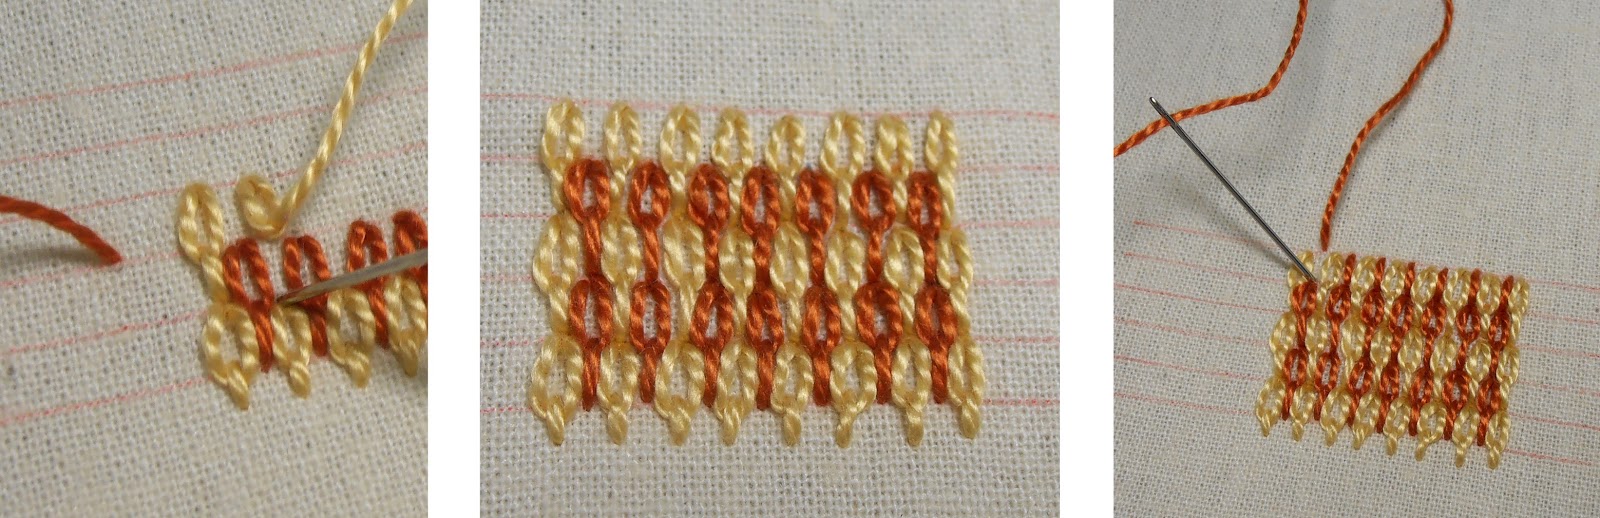
10. Stitching back across the shape, place a detached chain between each of the previous the same way you did before.
11. Continue to fill the shape this way until reaching the top.
12. To neaten the upper edge, place a straight stitch between each of the detached chains. for each stitch, bring the thread to the front on the outline and take it to the back between the stitches - that way a avoid accidentally splitting the detached chains.
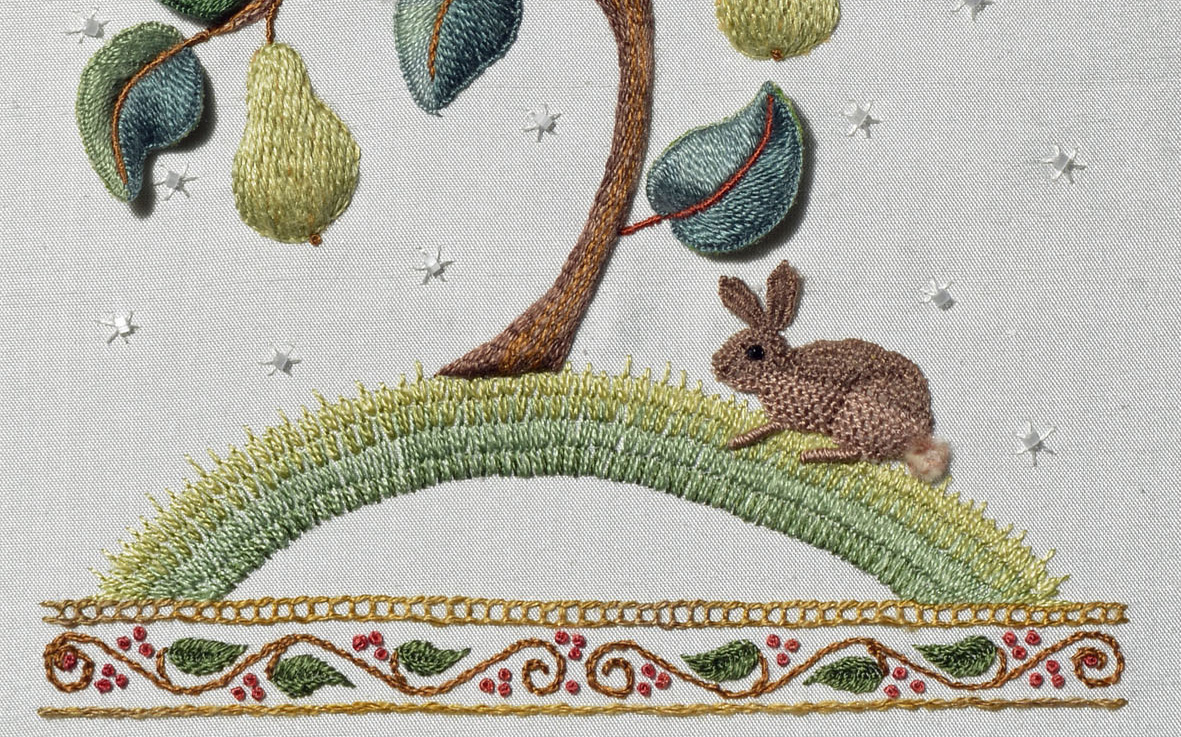
Of course you can use as many colours as you like. I used the same stitch for this hill and changed the shade for every row. By placing the detached chains with the anchoring stitches facing upwards, I had instant grass along the top of the hill.
Happy Stitching,
Anna X
PS - if you have not already done so, (of if you missed my Last Post) don't forget to add your name HERE to go into the draw to win 1 of 20 amazing needlecraft goodies.
How fab would that be just in time for Christmas???

This comment has been removed by a blog administrator.
ReplyDeleteОчень интересно!
ReplyDelete